
Mold could do lots of property and health damage if left unchecked. At Quest Mold & Asbestos Inspection & Testing, we follow a clearly defined procedure to ensure accurate results and easy-to-follow remediation instructions. What follows is an in-depth look at how mold testing is performed step by step.
1. Initial Site Inspection
Every project begins with a complete site inspection. Our state-licensed inspectors carefully inspect the property for points of concern, such as water damage, musty odors, or staining.
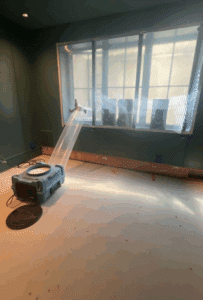
We also use infrared scanning and moisture reading scans in addition to the inspection. These tools allow us to identify hidden moisture behind walls, ceilings, or floors that can be creating the perfect environment for mold growth—even if there are no signs yet.
2. Determining the Type of Sampling
After the inspection, we determine the best type of mold testing:
Air Sampling – If there’s suspected mold but no visible mold, we collect air samples to quantify airborne spores. At least two samples are always required: one exterior control sample (to establish the level of spores against which we’ll compare subsequent samples) and at least one interior sample for comparison.
Surface Sampling – If mold is visible, we can get tape or swab samples directly from the affected area. These methods allow precise identification of the specific type of mold found on surfaces.
3. Laboratory Analysis
All the samples, once collected, are sent to an accredited laboratory for analysis. The lab identifies which types of mold are present and measures how high the levels are above normal background levels.
4. Results and Reporting
When the lab results are received, we create an in-depth report for you. The report will:
Identify which molds exist.
Categorize them as slightly, moderately, or substantially elevated.
Provide context on what those levels mean for your indoor environment.
Contain a customized remediation recommendation specific to your situation.
5. Remediation Guidance
While we do not perform remediation ourselves, our report does contain step-by-step recommendations that can be followed by your company of choice to remediate. This ensures that the mold is properly removed and conditions are returned to that of a healthy environment.
6. Post-Remediation Verification (PRV)
After remediation, post-remediation testing is highly recommended to be done. The last step ensures that all the mold has been effectively eliminated and that the indoor air quality in your home or business is at normal levels. PRV gives assurance and safeguards property owners and remediation contractors alike as it ensures that the cleanup is effective.
✅ The Bottom Line: It’s not a matter of finding mold—it’s about viewing the whole picture. From high-tech inspection technology to certified laboratory analysis, our method ensures you have credible information, transparent guidance, and assurance your environment is safe following remediation.